How to import and use CPAC certificates in Mozilla Thunderbird
If your certificate order was made from the computer where Thunderbird was installed, then you do not need to do anything. Your certificate is already installed in the program. You can go to the "Signing and Encrypting" section of this article.
If you purchased a certificate from another computer, then you will need to import it. You must use a browser supported by CPAC. You can transfer certificate files, for example, using email or via USB-drives.
How to import a certificate to Mozilla Thunderbird
- Open Thunderbird. Go to the section 'Tools'> 'Options'> 'Advanced'.
- Select the 'Certificates' tab. There, you can optionally enable the «Ask me every time» option in the section «When a server requests my personal certificate». You can select the desired Comodo Personal Authentication Certificate.
- Click 'View Certificates'
- In the certificate manager, open the 'Your Certificates' tab and click on the 'Import' button to initiate the import procedure.

- Select the desired directory where your PKCS12 certificate files are stored. Enter all required passwords.
- Click “OK” to finish the import process.
Done! You have successfully imported your CPAC certificate into Mozilla Thunderbird.
Signing and Encrypting
Signing emails is a way of making sure that the email came from you, and its content has not changed in the process of transmission.
Encrypting emails is a way to make sure that only the recipient of the email can open and read the content of the email and all attached files.
Note: to encrypt emails, you will need to add the sender's certificate to your certificate store. To receive a certificate, you need to receive a signed email from the recipient. As soon as you receive such an email, the certificate will be automatically added to the store. As a result, when communicating with this contact, you can send them signed/encrypted emails.
Certificate Binding Procedure
- Open Thunderbird. Go to the 'Tools'> Account Settings
- In the Account Settings menu, select the 'Security' item.
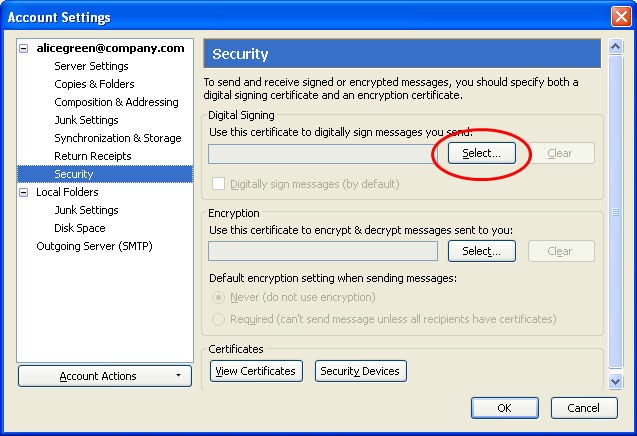
- Click on Select next to the 'Digital Signing' field. Select the required CPAC certificate from the list.
- Do the same for the 'Encryption' section.
- Finally, save the changes by clicking OK.
Signing and Encryption Email
Now, let's have a look at how to sign and encrypt emails. Let's start with signing the emails.
The method for signing emails will be as follows:
- Create an email, attach files.
- Click on Security and select “Digitally Sign This Message”
- Click Send. The mail will be signed and sent.

Email Encryption Algorithm:
- Create an email and attach all files.
- Make sure that you have the necessary certificate of the email recipient, and this certificate is attached to the required contact.
- Go to the Security section and select Encrypt This Message.
- Send the email.

How to set the signature and encryption of emails by default.
- Open Thunderbird and go to the 'Tools'> 'Account Settings' section.
- In the Account Settings section, select the 'Security' item.
- Set the appropriate options in the “Digital Signing” and “Default Encryption Settings” fields. All emails will then be signed and/or encrypted automatically.

The rules are simple: by default it is better only to set the signature of the emails. Encrypt emails only if necessary.
Do not forget to save the changes. Done!


